Contact Us

Name

Email *

Message *

Templates[dark](3)

Hot News[slider]

Download[two]

Free Widgets[hot](3)

Blogger Hack[three](3)

  • Blogger Hack ( 12 )

Trafic Tips[oneleft]

Twitter Tools[oneright]

Free Ebooks[combine]

Tabs

Flexible Home Layout

Hot in week

Sub menu section

Main menu section

RSS Subscription

Subscribe via RSS reader:
Subscribe via Email Address:
 
Showing posts with label Blogger Hack. Show all posts

Best Ways to Use Ghost Written Content

Posted By Abdel On 6:22 PM 0 comments
If you are seriously blogging to build your business, brand recognition, or to position yourself as an expert in your field, you should consider getting the assistance of a ghost writer.

The term “ghost writer” is so mysterious that many people tend to shy away from using such a service. Don’t let the term scare you.

A ghost writer is simply a freelance writer. These writers earn money by writing for various individuals or businesses on a contract basis or per assignment. When you buy content from a ghost writer, you own all rights to the text. You can publish the articles under your name.

There are several websites from which you can hire freelance writers: www.guru.com and www.getafreelancer.com are just a couple. Employers offer projects and writers bid on the jobs. They offer secure measures of payment and article receipt that benefit both the employer and the writer.

Most websites that feature freelance writers allow previous employers to leave comments about their satisfaction or dissatisfaction. Reading those comments can help you sift through and weed out ghost writing applicants.

Most of the websites also give writers the opportunity to upload a resume and samples of previous writings or photography. Take a little time to review that information. It will give you a valuable look into the style and experience level of all the writing applicants.

There are several ways you can best use ghost written content. Use the articles you purchase and upload them to an article submission service. Be sure to enter the maximum number of articles allowed so you will reap full benefit of the service. Having someone else write your articles will save you a tremendous amount of time!

In addition, maybe you can make arrangements with your ghost writer to actually upload the content for you as part of the writer’s fee. Always make sure you read the articles and give approval (or instructions for any changes that the writer must make). Make sure your ghost writer understands that the articles may be uploaded only after official approval has been given.

You can also benefit by using ghost written content on your blog. Find a writer with a style you enjoy reading. To reap most benefits from your ghost written articles, post them to Blogomator. At www.Blogomator.com you can upload all your blog content, predetermine when they’ll post and you won’t have to worry about your WordPress blog for a long time!

Not only does Blogomator free up your time, using ghost written material means you have more time to concentrate on your business or cause!

If you will be using material written by several ghost writers, remember to choose writers with similar styles. After all, the articles or blogs they write are helping you to brand yourself or your business. You want to show consistency to build a respectable image.

Here’s another huge benefit of using ghost writers: you can appear to be a professional writer, even if you’ve never written an article yourself. You suddenly have the image as a professional writer and an expert in your field, without spending any time at all writing!

Content from ghost writers can also be used to help bridge the language gap that the Internet helped expose. More and more people all over the world are starting online businesses. Ghost writers can provide website content for the language of your choice. So, you can effectively communicate with everyone in the world!

Don’t shy away from ghost writers just because you’ve never used one in the past. Ghost writers can free up more time for you to enjoy or work on other aspects of your business. You won’t have the worry about grammar or sentence structure, either!

The Ease of Blogging on Vacation

Posted By Abdel On 6:21 PM 0 comments
Bloggers know the importance of making regular posts to their WordPress sites. Most experts agree that it takes a minimum of three blog postings per week to be an effective blog writer. Posting at least three articles per week shows that you are a serious professional with expert knowledge in your field that you are willing to share on a regular basis.

Does that mean you can never take a week off (or longer) for vacation again? If you use Blogomator, you can have the best of both worlds – keep your free time plus maintain frequent postings.

There are a couple of ways to use Blogomator to your advantage.

First, you can upload your blog articles before your vacation ever starts. The program allows you to upload articles and schedule exactly when you would like to post them on your WordPress blog.

You could schedule blogs for an entire year or more and your readers would never know you were enjoying time with your family on a cruise!

The other way to fully utilize the Blogomator system is to blog while you are on vacation. You will not need to drag along your laptop or any special equipment!

Because there are no files to download when you use Blogomator, all you need is a computer and an Internet connection. So, whether you are vacationing on a beach along the United States coast or seeing all the sites in Paris, you can write your blog from any computer with an Internet connection.

Jaunt into an Internet café and tell your readers about your vacation as it is happening. Your readers will be impressed to know that even on vacation, you make time to stay in contact with them through your blog site.

Blogomator is very unique in that it requires no special files downloaded onto your own computer. That feature makes blogging truly portable for you! Entering a new blog entry is as easy as logging onto www.Blogomator.com and uploading the file.

You can even choose when you want the file to post. Post blogs on your vacation immediately or set them to post at another time. With Blogomator, you will never need to download updates or install plug ins. You will not even have to do any formatting of your article. It is as simple as writing your thoughts and clicking a button. Blogomator does all the rest for you!

If you happen to write more than one blog, that is not a problem. Blogomator allows you to post articles to one or one hundred blogs. And, with each, you control when your articles are posted!

Another added advantage to the Blogomator program is that if you use the services of a ghost writer, the writer may post your articles on your behalf. That will set you free to concentrate on other aspects of developing your business!

There is no need to look at blogging as a chore any more! Blogomator’s easy to use, common sense approach to posting delivers what every blogger wants: a way to make frequent posts without spending hours each week just to maintain a blog! After all, in most cases, a blog is one aspect of public relations for your business. You will be less likely to maintain an effective blog if it takes up too much of your valuable time!

Blogomator not only increases your writing efficiency by making blog posting easier, the fact that no special files or downloads are required makes the program truly carefree. To take advantage of all that Blogomator has to offer, sign up for the program today at www.Blogomator.com.

Getting Blog Comments notification by email

Posted By Abdel On 2:35 PM 2 comments
This tips is about receiving notifications and comments in your email box. so I will be brief :


  1. Login to blogger with your ID.
  2. Click Settings.
  3. settings
  4. Click Comments.
  5. comments
  6. Scroll down underside and you will find a box near the article Comment Notification Address, write your email address inside the box. for example : xxxxx@yahoo.com
  7. email address 
       
      Save, and it´s Finished.

    Now, it's done! :)
    happy bloggin.

    Open Commenter link in a new window

    Posted By Abdel On 10:31 AM 0 comments

    One of the bloggers nightmares is blogs have one or more links and when visitors click on the links which take them away from their blogs. To Fix this you just need to add that very charming HTML : target="_blank" within the link. This pretty code will open the link on a separated page and then will keep your blog open for visitor for more navigation.

    comment

    Let's stop talking and move to action :

    1. Log in to blogger with your ID
    2. Click Layout
    3. Click on Edit HTML
    4. Click on Download Full Template. Please backup your current template if something error while you edit your template
    5. Then Expand Widget Templates

      expand

    6. Find the following code ( quick search tip: Press F3 or Ctrl + F on your keyboard, fill in the code below and hit ENTER)
    7. Add the code target=’_blank’ or target=”_blank” (both are the same), so as the code becomes:
    8. Click SAVE TEMPLATE
    9. Done

    Try to open any post comment, and then click on the commenter , and admire your work.

    PS: This applies for any links, just add it and love it !!!

    Happy Blogging :)

    Remove posts counter on Archives:

    Posted By Abdel On 9:57 AM 0 comments

    archiveMany People are asking if there is a possibility to remove the Blog Archive posts counter (see image).

    Actually I like having this posts counter.But, yes there is a possibility to do that, and it so simple.


    The following are the very simple steps to remove is:

    Step #1

    Make sure that you have installed Archive widget on your blog’s sidebar.

    Step #2

    1. Log in to blogger with your ID
    2. Click Layout
    3. Click Edit HTML
    4. Please backup first your full template by clicking on “Download Full Template”
    5. Give a check in the small box beside the words Expand Widget Templates

      expand

    6. Find this code :
    7. The code is actually presented 3 timesso make sure you delete the 3 of them.
    8. Click SAVE TEMPLATE
    9. Finished

    Now the posts counter is gone :)

    Happy Blogging!

    Add Technorati Rank Widget on blogger

    Posted By Abdel On 3:38 AM 0 comments

    I Guess You All know Technorati.com !!

    Well, it's one of the very famous ping service web in the world. If you make monetize your blog, your blog should have better position in technorati.com because some money maker webs use Technorati position or ranking as a standard.

    To check your ranking position on Technorati; visiting the technorati.com and write the URL address in their search engine is the solution. But I it's not the only way nor the best.

    Add Technorati Rank with real time in your blog, seems the best idea and that's the reason I am writing this post.


    technorati rank


    Are you interested in adding technorati rank widget in your blog? If you are interested, The Please follow my step by step tutorial;

    Part I:

    1. Login into blogger with your ID
    2. Click Layout
    3. Click Edit HTML tab
    4. Find this code: ]]>< /b:skin >
    5. Add the following code before the code above:

      div.tec_name {
      display:none;
      }
      div.tec_rank {
      background: url(http://static.technorati.com/static/css/img/icn/talkbubble.png) 4px 3px no-repeat;
      padding-left: 25px;
      border:0;
      }
      div.tec_rank a:link, div.tec_rank a:visited {
      color: #390;
      text-decoration:none;
      font: normal 10px Verdana;
      }
      div.tec_rank a:hover {
      border-bottom:1px dotted #279627;
      }  

    6. Click save template
    7. Finish

    Part II:

    1. Click Page Elements
    2. Click Add a Gadget
    3. Click Plus (+) for HTML / JavaScript

      Add-a-Gadget

    4. Add the following code in that column


    PS: Change the XXXXX writing with your blog or web URL.

    Click Save button.
    Finish and you can then drag it to your desired position.


    Now you can check you blog rank any time :)

    Happy Blogging!

    Adding Digg Button to your blog posts

    Posted By Abdel On 6:34 PM 0 comments
    Do you know Digg.com? I'm sure you know about digg.com, because digg.com is a most popular site in the world. With digg.com you can discover and share your blog content. So it's one of the way to increse your blog traffic. But I do not want to converse many hitting about digg.com, which I will focussed is the step of installing the digg button on your page post. Yea, this is my mean :


    digg button on the post


    With Digg button you can easy to submit your post with your self or with your visitor to digg.com. Feel interesred to add digg button to your blog? this the steps :


    1. Login to blogger with your ID
    2. After entering the dashboard page , click Layout. Please see the picture :
    3. Then click edit HTML tab. Please see the picture :
    4. Click the Download full template link. Save your template:
    5. Please mark the little box beside Expand Widget Templates. Wait for a moment.
    6. Go to your template code, and find the code like this :
    7. <p><data:post.body/></p>
    8. Delete the code above and alter with following code :
    9. <p> <!-- DIGG --> <div style='float:right; margin-left:10px;'> <script type='text/javascript'> digg_url = '<data:post.url/>'; </script> <script src='http://digg.com/tools/diggthis.js' type='text/javascript'/> </div> <data:post.body/> </p>
    10. Click Save Template button.
    11. Done. Now digg button was added to your post.


    Allright, that is if your template code is original, how about template code was modified with Read more function as my post. You must change your read more code with this :


    <b:if cond='data:blog.pageType == "item"'>

    <style>.fullpost{display:inline;}</style>

    <p>
    <!-- DIGG -->
    <div style='float:right; margin-left:10px;'>
    <script type='text/javascript'>
    digg_url = '<data:post.url/>';
    </script>
    <script src='http://digg.com/tools/diggthis.js' type='text/javascript'/>
    </div>

    <data:post.body/>
    </p>


    <b:else/>

    <style>.fullpost{display:none;}</style>

    <p>
    <!-- DIGG -->
    <div style='float:right; margin-left:10px;'>
    <script type='text/javascript'>
    digg_url = '<data:post.url/>';
    </script>
    <script src='http://digg.com/tools/diggthis.js' type='text/javascript'/>
    </div>

    <data:post.body/>
    </p>


    <a expr:href='data:post.url'><b>Read More...</b></a>

    </b:if>


    Save your template and done.

    Well, we are done :) If you feel this post in usefull, please Digg it.


    Add a Social Bookmarking Button in blogger

    Posted By Abdel On 6:27 PM 0 comments
    bookmarkingbutton
    Actually, what are the advantages of those buttons? They function to ease you as the blog owner and visitors who want to submit into certain social bookmarking based on the available logo.

    If you are interested in adding social bookmarking button but still don’t know how, please read the steps below.
    1. Login into blogger with your ID
    2. Click Layout
    3. Click Edit HTML tab
    4. Click Download full Template. Please back up your template first.
    5. Please mark the little box beside Expand Widget Templates. Wait for a moment.
      expand-template


    6. Find this code ]]></b:skin>


    7. Copy and paste the following code right above ]]></b:skin>


      .bookmark{
      padding:0px;
      margin-top:15px;
      background:#ddd;
      }
      .bookmark a:hover {
      position: relative;
      top: 1px;
      left: 1px;
      }
      .bookmark img { border: 0;
      padding:0px;
      margin-top:15px;
      }


    8. Find this code </head>
    9. Copy and paste the following code right above </head>


      <script type='text/javascript'>
      //<![CDATA[ // Beautiful Beta Javascript Library // ------------------------------------------- // Version: 1.04 // Date: 2006-12-21 // Website: http://greatsalesstrategy.blogspot.com // -------------------------------------------
      function showsbtext(id,index) { var bookmarktext=document.getElementById(id); var sbValues= new Array(); sbValues[0] = 'Bookmark this post:'; sbValues[1] = 'Add to <strong>Digg</strong>'; sbValues[2] = 'Add to <strong>Delicious</strong>'; sbValues[3] = 'Add to <strong>Blinklist</strong>'; sbValues[4] = 'Add to <strong>Yahoo Web</strong>'; sbValues[5] = 'Add to <strong>Netvouz</strong>'; sbValues[6] = 'Add to <strong>Ma.gnolia</strong>'; sbValues[7] = 'Add to <strong>Fark</strong>'; sbValues[8] = 'Add to <strong>Furl</strong>'; sbValues[9] = 'Add to <strong>Technorati</strong>'; sbValues[10] = 'Add to <strong>Simpy</strong>'; sbValues[11] = 'Add to <strong>Spurl</strong>'; sbValues[12] = 'Add to <strong>Newsvine</strong>'; sbValues[13] = 'Add to <strong>Blinkbits</strong>'; sbValues[14] = 'Add to <strong>Smarkings</strong>'; sbValues[15] = 'Add to <strong>Segnalo</strong>'; sbValues[16] = 'Add to <strong>De.lirio.us</strong>'; sbValues[17] = 'Add to <strong>Reddit</strong>'; sbValues[18] = 'Add to <strong>Wists</strong>'; sbValues[19] = 'Add to <strong>Google</strong>'; sbValues[20] = 'Add to <strong>Stumbleupon</strong>'; document.getElementById(bookmarktext.id).innerHTML = sbValues[index]; }
      function getPostTitle(fullpath) { var splitinput = fullpath.split("/"); var lastpart = splitinput[5]; var linktext = lastpart.split(".html"); var postlink = fullpath.split("#"); var outputstring = linktext[0].replace(/-/g," "); outputstring = "\"" + outputstring + "\""; outputstring = outputstring.link(postlink[0]); document.write(outputstring); return; }
      function getCommentLink(clink) { var splitinput = clink.split("#"); var commentlink = splitinput[0]; commentlink = commentlink.concat("#comment-",splitinput[1]); var outputstring = "(more)"; outputstring= outputstring.link(commentlink); document.write(outputstring); }
      function showrecentcomments(json) { for (var i = 0; i < numcomments; i++) { var entry = json.feed.entry[i]; var alturl;
      if (i == json.feed.entry.length) break; for (var k = 0; k < entry.link.length; k++) { if (entry.link[k].rel == 'alternate') { alturl = entry.link[k].href; break; } } alturl = alturl.replace("#", "#comment-"); var postlink = alturl.split("#"); postlink = postlink[0]; var linktext = postlink.split("/"); linktext = linktext[5]; linktext = linktext.split(".html"); linktext = linktext[0]; var posttitle = linktext.replace(/-/g," "); posttitle = posttitle.link(postlink); var commentdate = entry.published.$t; var cdyear = commentdate.substring(0,4); var cdmonth = commentdate.substring(5,7); var cdday = commentdate.substring(8,10); var monthnames = new Array(); monthnames[1] = "Jan"; monthnames[2] = "Feb"; monthnames[3] = "Mar"; monthnames[4] = "Apr"; monthnames[5] = "May"; monthnames[6] = "Jun"; monthnames[7] = "Jul"; monthnames[8] = "Aug"; monthnames[9] = "Sep"; monthnames[10] = "Oct"; monthnames[11] = "Nov"; monthnames[12] = "Dec"; var comment = entry.content.$t; var re = /<\S[^>]*>/g; comment = comment.replace(re, ""); if (showcommentdate == true) document.write('On ' + monthnames[parseInt(cdmonth,10)] + ' ' + cdday + ' '); document.write('<a href="' + alturl + '">' + entry.author[0].name.$t + '</a> commented'); if (showposttitle == true) document.write(' on ' + posttitle); document.write(':<br/>'); if (comment.length < numchars) document.write('<i>' + comment + '</i><br/><br/>'); else document.write('<i>'+ comment.substring(0, numchars) + '...</i><br/><br/>'); } document.write('<span >Widget by <a href="http://hackosphere.blogspot.com">Hackosphere</a><br/>Powered by <a href="http://beautifulbeta.blogspot.com">Beautiful Beta</a></span><br/><br/>'); }
      //]]> </script>


    10. Drop your mouse down to the bottom of the template and find this code:
      <div class='post-footer-line post-footer-line-1'>
      and some time like this
      <p class='post-footer-line post-footer-line-1'>

    11. Copy the following code and paste under this code <div class='post-footer-line post-footer-line-1'>


      <span class='bookmark'> <table align='left' border='0' cellpadding='0' width='100%'> <tr> <td style='vertical-align:middle' valign='middle' width='25%'> <div expr:id='&quot;sbtxt&quot;+data:post.id'>Bookmark this post:</div><script type='text/javascript'>showsbtext(&quot;sbtxt&quot; + &quot;<data:post.id/>&quot;,0)</script> </td> <td> <a expr:href='&quot;http://www.stumbleupon.com/submit?url=&quot; + data:post.url + &quot;&amp;title=&quot; + data:post.title' expr:onmouseout='&quot;javascript:showsbtext(\&quot;sbtxt&quot; + data:post.id + &quot;\&quot;,0);&quot;' expr:onmouseover='&quot;javascript:showsbtext(\&quot;sbtxt&quot; + data:post.id + &quot;\&quot;,20);&quot;' rel='nofollow' target='_blank'><img alt='StumpleUpon' src='https://blogger.googleusercontent.com/img/b/R29vZ2xl/AVvXsEiRfR1mFuOR0aOly6aevKUa-d5T0ClEWTYFE9BeLxqsX4RchfSRYoUzFIE6nE_TVyt-YKmd4wYVVfmzFXGGeD4CKOM4tjmZrOdkX4QH1WjmOY6wgNct3QjYeoJjm_o2FWEJ56ZvcNFnbX0/?imgmax=800'/></a> <a expr:href='&quot;http://ma.gnolia.com/bookmarklet/add?url=&quot; + data:post.url + &quot;&amp;title=&quot; + data:post.title' expr:onmouseout='&quot;javascript:showsbtext(\&quot;sbtxt&quot; + data:post.id + &quot;\&quot;,0);&quot;' expr:onmouseover='&quot;javascript:showsbtext(\&quot;sbtxt&quot; + data:post.id + &quot;\&quot;,6);&quot;' rel='nofollow' target='_blank'><img alt='Ma.gnolia' border='0' src='http://home.kpn.nl/oosti468/images/icon_sb_mag.gif'/></a> <a expr:href='&quot;http://digg.com/submit?phase=3&amp;url=&quot; + data:post.url' expr:onmouseout='&quot;javascript:showsbtext(\&quot;sbtxt&quot; + data:post.id + &quot;\&quot;,0);&quot;' expr:onmouseover='&quot;javascript:showsbtext(\&quot;sbtxt&quot; + data:post.id + &quot;\&quot;,1);&quot;' rel='nofollow' target='_blank'><img alt='DiggIt!' src='http://home.kpn.nl/oosti468/images/icon_sb_dig.gif'/></a> <a expr:href='&quot;http://del.icio.us/post?url=&quot; + data:post.url + &quot;&amp;title=&quot; + data:post.title' expr:onmouseout='&quot;javascript:showsbtext(\&quot;sbtxt&quot; + data:post.id + &quot;\&quot;,0);&quot;' expr:onmouseover='&quot;javascript:showsbtext(\&quot;sbtxt&quot; + data:post.id + &quot;\&quot;,2);&quot;' rel='nofollow' target='_blank'><img alt='Del.icio.us' src='http://home.kpn.nl/oosti468/images/icon_sb_del.gif'/></a> <a expr:href='&quot;http://www.blinklist.com/index.php?Action=Blink/addblink.php&amp;Description=&amp;Url=&quot; + data:post.url + &quot;&amp;Title=&quot; + data:post.title' expr:onmouseout='&quot;javascript:showsbtext(\&quot;sbtxt&quot; + data:post.id + &quot;\&quot;,0);&quot;' expr:onmouseover='&quot;javascript:showsbtext(\&quot;sbtxt&quot; + data:post.id + &quot;\&quot;,3);&quot;' rel='nofollow' target='_blank'><img alt='Blinklist' src='http://home.kpn.nl/oosti468/images/icon_sb_bli.gif'/></a> <a expr:href='&quot;http://myweb2.search.yahoo.com/myresults/bookmarklet?u=&quot; + data:post.url + &quot;&amp;=&quot; + data:post.title' expr:onmouseout='&quot;javascript:showsbtext(\&quot;sbtxt&quot; + data:post.id + &quot;\&quot;,0);&quot;' expr:onmouseover='&quot;javascript:showsbtext(\&quot;sbtxt&quot; + data:post.id + &quot;\&quot;,4);&quot;' rel='nofollow' target='_blank'><img alt='Yahoo' src='http://home.kpn.nl/oosti468/images/icon_sb_yah.gif'/></a> <a expr:href='&quot;http://www.furl.net/storeIt.jsp?u=&quot; + data:post.url + &quot;&amp;t=&quot; + data:post.title' expr:onmouseout='&quot;javascript:showsbtext(\&quot;sbtxt&quot; + data:post.id + &quot;\&quot;,0);&quot;' expr:onmouseover='&quot;javascript:showsbtext(\&quot;sbtxt&quot; + data:post.id + &quot;\&quot;,8);&quot;' rel='nofollow' target='_blank'><img alt='Furl' src='http://home.kpn.nl/oosti468/images/icon_sb_fur.gif'/></a> <a expr:href='&quot;http://www.technorati.com/cosmos/search.html?url=&quot; + data:post.url' expr:onmouseout='&quot;javascript:showsbtext(\&quot;sbtxt&quot; + data:post.id + &quot;\&quot;,0);&quot;' expr:onmouseover='&quot;javascript:showsbtext(\&quot;sbtxt&quot; + data:post.id + &quot;\&quot;,9);&quot;' rel='nofollow' target='_blank'><img alt='Technorati' src='http://home.kpn.nl/oosti468/images/icon_sb_tec.gif'/></a> <a expr:href='&quot;http://www.simpy.com/simpy/LinkAdd.do?href=&quot; + data:post.url + &quot;&amp;title=&quot; + data:post.title' expr:onmouseout='&quot;javascript:showsbtext(\&quot;sbtxt&quot; + data:post.id + &quot;\&quot;,0);&quot;' expr:onmouseover='&quot;javascript:showsbtext(\&quot;sbtxt&quot; + data:post.id + &quot;\&quot;,10);&quot;' rel='nofollow' target='_blank'><img alt='Simpy' src='http://home.kpn.nl/oosti468/images/icon_sb_sim.gif'/></a> <a expr:href='&quot;http://www.spurl.net/spurl.php?url=&quot; + data:post.url + &quot;&amp;title=&quot; + data:post.title' expr:onmouseout='&quot;javascript:showsbtext(\&quot;sbtxt&quot; + data:post.id + &quot;\&quot;,0);&quot;' expr:onmouseover='&quot;javascript:showsbtext(\&quot;sbtxt&quot; + data:post.id + &quot;\&quot;,11);&quot;' rel='nofollow' target='_blank'><img alt='Spurl' src='http://home.kpn.nl/oosti468/images/icon_sb_spu.gif'/></a> <a expr:href='&quot;http://reddit.com/submit?url=&quot; + data:post.url + &quot;&amp;title=&quot; + data:post.title' expr:onmouseout='&quot;javascript:showsbtext(\&quot;sbtxt&quot; + data:post.id + &quot;\&quot;,0);&quot;' expr:onmouseover='&quot;javascript:showsbtext(\&quot;sbtxt&quot; + data:post.id + &quot;\&quot;,17);&quot;' rel='nofollow' target='_blank'><img alt='Reddit' src='http://home.kpn.nl/oosti468/images/icon_sb_red.gif'/></a> <a expr:href='&quot;http://www.google.com/bookmarks/mark?op=add&amp;bkmk=&quot; + data:post.url + &quot;&amp;title=&quot;+data:post.title' expr:onmouseout='&quot;javascript:showsbtext(\&quot;sbtxt&quot; + data:post.id + &quot;\&quot;,0);&quot;' expr:onmouseover='&quot;javascript:showsbtext(\&quot;sbtxt&quot; + data:post.id + &quot;\&quot;,19);&quot;' rel='nofollow' target='_blank'><img alt='Google' src='http://home.kpn.nl/oosti468/images/icon_sb_goo.gif'/></a> </td> </tr> </table> </span>


    12. Click Save Template button.
    13. Finish
    Now, You are done :)


    Blogger Tools SEO Firefox Plugins

    Posted By Abdel On 2:01 PM 0 comments

    Anyone who has tried search engine optimization knows how important keyword research is. Well, good news everyone; keyword research just got a whole lot quicker and easier with Wordtracker's new, free Firefox extension - SEO Blogger.

    With the click of a button you get a mini version of Wordtracker's keyword research tool right in your browser window. Now you can do your keyword research without leaving your blog post editing page!

    You can download SEO Blogger here for free.

    The following image is a screen grab of SEO Blogger being used within Firefox as I prepare to write a new blog post on the subject of 'social media':

    SEO Blogger on WordPress

    Over the next few months, I will be writing a series of articles all about the benefits and practices of keyword research. We'll explore together how keyword research can help you beyond the normal confines of SEO and into the mind of your prospects.

    But first I want to start by showing you how SEO Blogger makes it easy to perform keyword research and how it helps you to quickly optimize a page you are working on - all in a single browser window.

    Grab SEO Blogger now

    Your first job is to download SEO Blogger. Click the button below to be taken to the download site. You might see a notification telling you that Wordtracker wants to open a popup. You will need to agree to this to get the software.

    Once installed you will see a small 'W' icon in your status bar at the bottom right of your Firefox window. See the following image:

    SEO Blogger

    Click the 'W' and SEO Blogger opens up in a sidebar within your Firefox browser.

    Optimizing your blog post

    What is your blog post about? My post in this example is about 'social media'. If I enter this phrase into the SEO Blogger pane I can see that 'social media' is searched 215 times, but also that there are the more specific phrases 'social media marketing', 'social media platform' and 'what is social media' that contain this phrase.

    Enter seed keywords and phrases relevant to your article content to find the most sought-after phrases and specific variations. Ideally you would have a phrase that covers multiple searches, but you will do fine just to match what your prospects are searching for. Find other phrases that are related so that you can salt them through your article in the text and in things like alt-tags for images, and subheadings.

    Save any keywords you're interested in by hitting the little "Add" links next to the phrases. This stores them in the bottom box just so you remember for later.

    Now you have a list of phrases you can optimize your post for. Start with the most important phrase - this needs to go in your article's 'page title tag', on-page headline and description tag. If suitable, use some of the other suggested keywords in the body of your article, keeping the flow natural. Don't make the mistake of trying to force phrases in there.

    Whilst you are writing, SEO Blogger will make a count of the number of times you use the keywords you have saved in the 'Your chosen keywords' list. These counts will be saved in the 'Used' column (see the image below):

    SEO Blogger keyword count

    Publish and promote

    Once you are done, sit back, admire your handy work, and publish.

    Actually, the job isn't done entirely. You will need to promote your blog post in social media, among your friends, on Twitter, and so on. In order to rank you will need to get links to this page using the same or similar phrases as the anchor text, and that means letting people know you have posted another great nugget of wisdom.

    This is another good reason to have multiple variations, as exact matches can look unnatural to the search engines; so when linking from old posts, or getting links from outside, mix it up a bit.

    Such on-page SEO as this is just a small part of keyword research, SEO and the wider job of creating an effective blog. So look out for a deeper exploration in future articles coming soon!

    And we always recommend that on-page SEO takes place within a considered and planned SEO strategy.

    Meanwhile, enjoy some 5 minute SEO with Wordtracker's SEO Blogger. Grab your free copy of SEO blogger here.

    How to add Favicon to blogger

    Posted By Abdel On 1:21 PM 0 comments
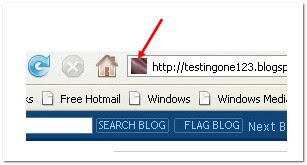
    or those who don't know what Favicon is 'Favicon is a small icon(image) displayed at the beginning of the address bar of the browser.It is also called Favourite Icon,Pageicon and urlicon.

    The main advantage of creating and using favicon is ,it makes it easy to find your blog or site when someone favourited or bookmarked your site/blog among several other sites.


    favicon Most of the people use 16*16 pixel favicon(you can also use 32*32 pixel favicon) with ".ico" format.But,you can also use gif,png(image formats) aswell.

    So,ready to create a favicon?
    All you need is a program to create a favicon in (.ico) format.If you haven't a program to create in .ico format,No Problem....you can also use png or gif format.If you have Photoshop, or any other programs like that,open it and create a 16*16 image and save it as .png or gif format [look at the below screenshot below] or there are so many online sites which can create a favicon for you,just search by typing'free online 16*16 icon generator' in google.They ask you to upload a picture from your desktop,and they convert it into 16*16 .ico file.

    save the image in png format So,Now your icon is ready...You are just a few steps away from creating a beautiful favicon for your site...

    Now,go to Google Page Creator
    and upload your icon file by clicking on the upload link(look at right side) and browse the file and note down the url of the file by clicking on the file.[see the screenshots below]


    note down the url
    Now,go to your blogger dashboard>layout>Edit html[look at the below screenshots]


    and look for this code(it is at the top the template)


    and add the below code just after the above one[as shown in the below screenshot]


    replace the 'URL OF YOUR ICON' with the url of your icon file.(like http.......ico)
    That's it! Now you can see a beautiful favicon in your blog.

    "Donate" Button HTML Code

    Posted By Abdel On 6:40 PM 0 comments
    The example code below shows the minimum information you need to create a Donate button (in this case, to make a $25.00 USD donation):

    <form name="_xclick" action="https://www.paypal.com/cgi-bin/webscr" method="post">
    <input type="hidden" name="cmd" value="_xclick">
    <input type="hidden" name="business" value="
    Your Paypal Account">
    <input type="hidden" name="item_name" value="
    Your Name">
    <input type="hidden" name="currency_code" value="USD">
    <input type="hidden" name="amount" value="25.00
    ">
    <input type="image" src="http://www.paypal.com/en_US/i/btn/btn_donate_LG.gif" border="0" name="submit" alt="Make payments with PayPal - it's fast, free and secure!">
    </form>

    • PS: Edit what is in Bold characters!!

    Pasting this code into your website would generate a button that looks like this:

    Sample Donate Button

    Plugins

    Posted By Abdel On 8:13 AM 0 comments

    WordPress PluginsOn this page you will find a list of all WordPress Plugins which BloggingTips has developed for it’s users. Each plugin has its own page which includes a description of the plugin, instructions on how to use the plugin and answers to commonly asked questions.

    Please note that all of our plugins can be downloaded from the Official WordPress Plugin Directory.


    BloggingTips WordPress Plugins

    Twitter User Twitter User is a simple plugin which adds an additional box to the author pages profile in which they can add their twitter username.

    How to install a WordPress Plugin

    Installing a WordPress Plugin is very easily. Here are some basic instructions on how to install a plugin in WordPress.

    1. Download Twitter User in zip format from the WordPress Directory.
    2. Install the plugin in your WordPress powered blog. There are two ways to do this :
      1. Upload the zip file directly to your blog at www.yourblogsdomain.com/wp-admin/plugin-install.php. If you prefer to use this method, please make sure you have your hosting username and password ftp details available. Please note, older versions of WordPress may not have the option to upload plugins directly through your blog admin area.
      2. Alternatively, you can upload the plugin to your blog using File Transfer Protocol. All you need to do is unzip the plugin and upload the plugin directly to www.yourblogsdomain.com/wp-content/plugins/.
    3. Activate the plugin at www.yourblogsdomain.com/wp-admin/plugins.php

    After you activated the plugin you may have to add some information to a settings area or add some code to your blogs theme before the plugin works but this depends on the plugin so make sure you always read the developers instructions.

    Additional

    • The Official WordPress Plugin Directory is without doubt the largest directory or WordPress Plugins on the web and the best place to start your search for the plugin you need to enhance your blog.
    • Stuff By SarahAll BloggingTips WordPress Plugins are developed by BloggingTips author and Sarah from Stuff By Sarah. Sarah has been working with WordPress for years and through her blog posts on BloggingTips and her own blog Stuff By Sarah she has helped thousands of bloggers develop, improve and understand their blogs backend structure.

    Share on facebook